Expert ROMSHI talks about lasers
Inside the Whale Procedures (in the spirit of Pinocchio, Jonah, and the legendary whale) — this is no longer just fantasy; it's a full-on extreme beauty challenge for 2026!

Imagine: you've been swallowed by a giant sperm whale (Monstro-style), sitting in its stomach surrounded by ship wreckage, old fishing nets, and... you want to do laser hair removal, biorevitalization, or at least a peel.
Modern cosmetology could theoretically handle it, but the conditions are pure horror + sci-fi. Let's break it down point by point (with humor, but realistically).1. Which Procedures Are Actually Doable Inside a Whale?
Inside a whale, only the simplest and most portable procedures are realistically possible — laser/IPL hair removal or basic masks.
Everything else risks turning you into "whale cosmetics" (like ambergris from its intestines, which was once added to perfumes). If you're seriously tempted to try — start with a goldfish aquarium instead.
Modern cosmetology could theoretically handle it, but the conditions are pure horror + sci-fi. Let's break it down point by point (with humor, but realistically).1. Which Procedures Are Actually Doable Inside a Whale?
- Laser / IPL hair removal — top choice!
Portable devices like Tria 4X or Ulike Air 10 (diode laser or IPL) weigh only 300–500 g and run on battery. External vacuum doesn't affect them, and light penetrates skin the same way.
Downside: complete darkness inside the stomach — aiming is hard.
Solution: headlamp (or firelight, Pinocchio-style).
Bonus: whale mucus acts as a natural "gel" — slippery, but it hydrates. - Microneedling or RF lifting — possible with portable Dr.Pen or mini-RF devices (~200 g), but sterility is a huge problem. Inside the whale: 100% bacteria + strong acid (pH ~2–3 from gastric juice).
Risk: instead of rejuvenation you get a chemical burn + infection on the level of "I am now part of the whale". - Injections (Botox, fillers, biorevitalization) — almost impossible. Need sterile syringes, but everything here is covered in saliva and fish. Plus the constant shaking from the whale's movements — your hand slips and the filler ends up in the esophagus.
- Peels / masks — easy! Bring tube AHA/BHA fruit acids. Whale acid + your acid = super-peel. Skin renews in one session (or burns off in 5 minutes).
- Facial massage / gua sha — perfect! Use a broken mast as a roller. Whale spermaceti (sperm whale fat) — a natural historical moisturizer (used in cosmetics until whaling was banned).
 laser")
- Batteries — charge them fully on the ship beforehand. Inside: dark, humid, cold slime (whale body temperature ~36–37°C, but mucus feels cold). Moisture kills batteries faster.
- Solar panels — useless (you're inside).
- Bio-energy hack (fantasy level): connect the device to electric eels the whale also swallowed (in reality sperm whales eat squid, but let's imagine). Or rub against the stomach walls like a dynamo (pure nonsense).
- Fire — the classic Pinocchio move! Light a fire from wreckage → get light + heat for procedures (and the whale will sneeze/cough you out, just like in the fairy tale).
- Stomach acid will dissolve your skin in hours. Do everything fast (full body laser course — 10 minutes max per zone).
- Whale movement — shaking like an 8–9 magnitude earthquake. Hold the device as tightly as possible against your body (no negative-stiffness isolators will help).
- Smell — hellish (fish + acid + whale stench). Charcoal mask is a must-have.
- Exit strategy — after the session, make a bigger fire → massive cough → you fly out like Pinocchio. Perfect "final touch" — fresh, smooth skin post-procedure!
- Take a portable IPL laser + power bank + headlamp + acid-resistant protective suit.
- Let yourself be swallowed (voluntarily, for TikTok/Reels content).
- Inside: 15-minute bikini/legs laser session (in total darkness, mostly by feel).
- Light a big fire from debris.
- Whale sneezes → you shoot out with perfectly smooth skin and a million-view story.
, repair laser")
Inside a whale, only the simplest and most portable procedures are realistically possible — laser/IPL hair removal or basic masks.
Everything else risks turning you into "whale cosmetics" (like ambergris from its intestines, which was once added to perfumes). If you're seriously tempted to try — start with a goldfish aquarium instead.

Traveling to the 15th Century (c. 1400–1500, Europe) with Modern Cosmetology Knowledge — A Dream and Nightmare for an Amateur DermatologistYou arrive without lasers, peptides, bottled retinol, synthetic hyaluronic acid, SPF filters, or sterile injectables.
 with Modern Cosmetology Knowledge")
But you do have access to a huge arsenal of natural ingredients that were already in use at the time (according to texts by Trotula, Caterina Sforza, Hildegard von Bingen, and other surviving sources).
Surprisingly, many of them are the direct historical ancestors of modern active ingredients!Here’s how to get as close as realistically possible to 2026-level skincare using only materials and techniques actually available in the 15th century.Basic Routine — Cleansing + Hydration + Protection (already practiced then)
- Cleansing (equivalent to gentle gel cleanser / micellar water)
- Wood ash (especially beech or oak) + water → lye solution — the basis of medieval soap.
- Gentler option: oat flour/bran + milk / rose water — a very mild exfoliating cleanser (remarkably similar to modern oat-based cleansers).
- For dry skin: egg yolk + honey — a nourishing cleansing balm, rinsed off with warm water.
- Exfoliation / Peeling (AHA/BHA analogues)
- Acid peel: strongly diluted wine or apple vinegar (5–10% in water or rose water) — mild AHA-like effect, brightens and exfoliates.
- Lemon juice + honey — natural vitamin C + antioxidants (very close to modern vitamin C serums).
- Mashed strawberries/wild strawberries — natural fruit acids.
- Hydration & Barrier (hyaluronic acid + ceramides + emollients equivalents)
- Rose water (distilled rose petals) — the universal medieval toner/hydrator.
- Honey — natural humectant (draws moisture like glycerin).
- Fats/oils: goose or lard fat, olive oil, sweet almond oil, beeswax → base for all ointments (very occlusive, rich creams — similar to modern petrolatum + oil balms).
- Egg white — light film-forming mask for tightening and light hydration.
- Brightening / Even Tone (vitamin C, niacinamide, tranexamic acid analogues)
- Wheat flour paste (soaked 15 days → fermented crystals mixed with rose water) — the classic aristocratic white powder base.
- Crushed white lily root — known brightening agent.
- Fresh parsley or cucumber juice — reduces pigmentation.
- Anti-Aging / Collagen Stimulation (retinol / peptide analogues)
- Bakuchiol — seeds/leaves of Psoralea corylifolia (if you’re lucky enough to get it through Eastern spice traders) — the closest natural retinol-like active (without the irritation!).
- Rose oil + saffron + musk — for glow and firmness.
- Regular masks: egg yolk + honey + olive oil — deep nourishment and repair.
- Wax: Greek pitch (resin) + beeswax + galbanum resin — boiled for a long time → effective medieval depilatory wax (surprisingly good).
- Dangerous (but historically popular) option: quicklime + orpiment (arsenic sulfide) — never use this; it causes severe chemical burns and poisoning.
 with Modern Cosmetology Knowledge")
- White base: lead white (very toxic — widely used) → safe alternative: rice or wheat flour.
- Blush & lips: alkanet root (red), elderberry/raspberry juice, carmine from cochineal (if you can source it).
- Brows/lashes: soot + fat — very close to modern kajal.
- Morning:
Wash with oat bran + rose water. - Serum:
Lemon juice + honey + rose water (vitamin C + hydration). - Cream:
Beeswax + olive oil + rose petals/oil (rich occlusive barrier). - Protection:
Wide-brimmed hat + strict sun avoidance (pale skin = beauty standard). - Evening:
Egg yolk + honey mask → rinse → apply rich fat-based ointment. - 1–2× per week:
Diluted vinegar peel (carefully!) + parsley brightening mask.
- Potent actives (retinol strength, peptides, niacinamide, AHAs/BHAs at therapeutic concentrations)
- True broad-spectrum UV protection
- Non-comedogenic textures
- Sterility & precise delivery systems
Why Laser Hair Removal on Dark Skin Requires Special Caution. Laser hair removal works on the principle of selective photothermolysis: the laser light is absorbed by melanin (the pigment) in the hair, converts into heat, and destroys the hair follicle.
On light skin (Fitzpatrick types I–III), there is a strong contrast between the hair and the surrounding skin — the skin contains very little melanin, so the laser mostly targets the follicle and barely affects the skin.On dark skin (Fitzpatrick types IV–VI — from olive to very dark/black), the situation changes dramatically.Main Reason for Caution: High Melanin Content in the Skin Itself
On dark skin, laser hair removal can be very safe and effective — but only with the right wavelength (preferably 1064 nm or carefully tuned 808 nm), powerful cooling, low-and-slow settings, and a truly experienced practitioner.
- The skin contains a large amount of melanin (especially in the basal layer of the epidermis).
- The laser cannot perfectly distinguish between melanin in the hair and melanin in the skin → a significant portion of the energy is absorbed by the epidermis.
- Result: the skin heats up much more than desired → high risk of burns, blisters, hyperpigmentation (dark spots), hypopigmentation (light spots), and even scarring in severe cases.
- On types IV–V (medium-dark to dark skin) the risk is already noticeably higher.
- On type VI (very dark/black skin) the risk of side effects is the highest if settings or the laser type are incorrect.
- Even with a properly performed procedure on dark skin, temporary redness, swelling, and sometimes mild hyperpigmentation are more common (usually resolves in 1–4 weeks).
- 1064 nm Nd:YAG — the safest choice for types V–VI: this wavelength is very weakly absorbed by epidermal melanin, penetrates deeply, and still effectively reaches the follicle.
- 808 nm diode — an excellent “golden middle”: deep enough penetration, good absorption by hair melanin, and — with powerful cooling and correct settings (low fluence, long pulse duration) — safe for types IV–V and often even for VI.
Studies conducted in 2025 on women with types IV–VI in Sudan confirmed: 808 nm provides high efficacy, minimal side effects, and very high patient satisfaction. - 755 nm alexandrite — almost never recommended for IV–VI without extremely cautious settings (very high risk).
- Choose only an experienced specialist who has extensive experience specifically with dark skin types (ideally a dermatologist or a clinic with proven reviews/results on types IV–VI).
- Always perform a test patch (small test shot) on a discreet area 24–48 hours before the full procedure.
- Use maximum cooling possible (sapphire tip down to –10 °C, cryogen spray, strong contact cooling).
- Start with low energy and long pulse duration, gradually increasing only if tolerated well.
- Strictly avoid sun exposure/tanning for 4–6 weeks before and after (even mild tanning dramatically increases risk).
- After the procedure: apply SPF 50+ daily, avoid direct sun, saunas, hot showers, and intense sports for at least 48 hours.
On dark skin, laser hair removal can be very safe and effective — but only with the right wavelength (preferably 1064 nm or carefully tuned 808 nm), powerful cooling, low-and-slow settings, and a truly experienced practitioner.
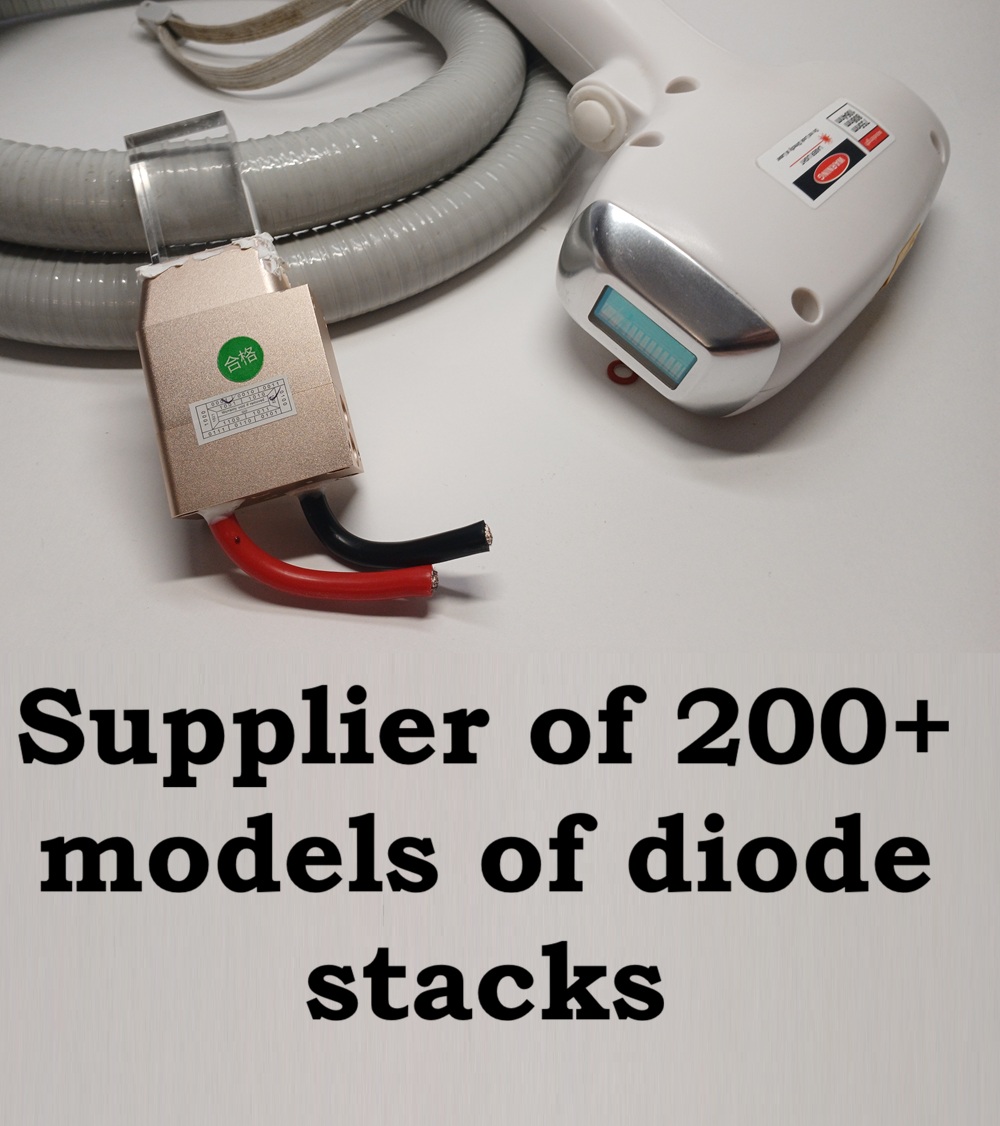
Why Cheap Hair Removal Machines Are So Cheap.Cheap diode lasers (usually priced at 50,000–150,000 RUB) may look like a great deal at first glance, but the low price directly reflects serious compromises in quality, reliability, and real effectiveness.
Here are the main reasons for the low cost — no marketing fairy tales.1. Cheap Diode Bars and Stacks
Cheap machines are often the "entry ticket" for very small or startup salons — but in most cases they turn into an expensive and painful lesson.
It's usually much smarter to choose a mid-range device or a proven OEM model with real components and support.
- High-quality bars (Coherent, nLight, Jenoptik) are expensive — they often account for 20–50% of the total cost of a premium machine.
- Cheap machines use no-name Chinese bars or second-grade / rejected batches.
- Result: lifetime of only 3–5 million shots instead of 10–20 million, rapid overheating, uneven beam spot, noticeable power degradation within 6–12 months.
- Premium machines: microchannel cooling + powerful TEC (thermoelectric cooler) + high-quality pump and heat exchanger.
- Cheap ones: macrochannel or simple water cooling + weak fan.
- Result: the stack overheats quickly, frequent "overheat" errors, significant power drop during long sessions.
- Thin plastic housing, weak fasteners, no proper dust/moisture protection.
- Result: breakdowns from normal vibrations, dust kills the system much faster, "toy-like" appearance — clients immediately lose trust.
- Low-end microcontrollers, simple current drivers with poor stabilization.
- No protection against power surges, no precise current control.
- Software: basic interface or cheap Android clone, no updates ever.
- Result: unstable output power, frequent errors, no automatic adjustments for different skin phototypes.
- No certification at all, or fake CE/FDA certificates (real ones are very expensive).
- No clinical trials or proper safety testing.
- Result: legal risks for the salon (fines, client complaints), and very weak real-world performance.
- No outgoing quality control (OQC).
- No individual calibration of each machine.
- Result: 20–30% of units come with factory defects right out of the box (uneven spot, low actual power, early failures).
- Cheap laser: 100,000 RUB + stack replacement after 1 year (30–50,000 RUB) + loss of clients due to poor/weak results = in 1–2 years you actually overpay compared to buying a better machine from the start.
- Quality machine (300–500,000 RUB) usually lasts 5–7 years with minimal extra investment.
Cheap machines are often the "entry ticket" for very small or startup salons — but in most cases they turn into an expensive and painful lesson.
It's usually much smarter to choose a mid-range device or a proven OEM model with real components and support.
How the Diode Stack (Bar Stack) Degrades Over Time in a Cosmetic 808 nm LaserThe diode stack (also called diode bar stack) is the heart of an 808 nm laser system.
It usually consists of 10–60 laser bars, with each bar containing 10–40 individual diode emitters made from GaAs/AlGaAs semiconductors.
Degradation is the gradual loss of output power and efficiency caused by various physical and chemical processes. Manufacturers typically claim a lifetime of 10–30 million shots, but in real-world conditions the actual useful life is usually 5–20 million shots, depending heavily on quality and operating conditions.Main Mechanisms of Degradation
Degradation is inevitable — it’s the fundamental physics of semiconductor devices.
However, with proper operation and maintenance, a good-quality diode stack can deliver 15–20 million shots with acceptable performance (losses <20–25%). If you’re already seeing specific signs of degradation (uneven spot, sudden power drop, overheating errors, etc.) — describe the symptoms and I’ll help you diagnose what’s most likely happening!
Degradation is the gradual loss of output power and efficiency caused by various physical and chemical processes. Manufacturers typically claim a lifetime of 10–30 million shots, but in real-world conditions the actual useful life is usually 5–20 million shots, depending heavily on quality and operating conditions.Main Mechanisms of Degradation
- Thermal Degradation (most common, 60–70% of cases)
- Each pulse heats the diodes to 50–80 °C.
- Repeated heating/cooling cycles create thermomechanical stress → micro-cracks in the active region, dislocations in the crystal lattice.
- Result: quantum efficiency drops → power decreases by approximately 0.1–0.5% per million shots.
- Electromigration and Contact Degradation
- High current (up to 100–200 A per bar) causes metal atoms (indium, gold) to migrate in the contacts.
- Voids (empty spaces) and “whiskers” form → electrical resistance increases, leading to localized overheating.
- Result: individual emitters fail (“burn out”), the bar loses power unevenly → dark lines or uneven spots appear in the treatment beam.
- Catastrophic Optical Damage (COD)
- Extremely high optical power density at the diode facet causes local melting or oxidation.
- Starts with “dark line defects”, then sudden complete failure of the bar.
- Most common when current is exceeded or cooling is inadequate.
- Degradation Related to Cooling System
- Condensation inside microchannels (poor sealing) → corrosion.
- Contaminated/distilled water → reduced heat transfer → accelerated thermal degradation.
- Photochemical Degradation
- UV component of the laser’s own emission slowly breaks chemical bonds in the active layer.
- A relatively slow but cumulative process.
- 0–5 million shots: Almost unnoticeable (<5% power loss).
- 5–10 million shots: Power drops 10–20% → you need to increase energy settings to achieve the same clinical effect.
- 10–15 million shots: Losses 20–40% → beam becomes visibly uneven (dark lines/stripes), clients start complaining about weaker results.
- 15+ million shots: Losses >50% → multiple dead bars, frequent overheating, error messages, handpiece becomes unreliable.
- Overheating (poor cooling, dust buildup, high room temperature).
- Operating above recommended current/energy settings.
- Frequent on/off cycles (especially without proper warm-up/cool-down).
- Low-quality diode bars (cheap Chinese “no-name” vs reputable brands like Coherent, nLight, Jenoptik).
- Keep cooling water temperature stable at 20–25 °C.
- Perform regular cleaning of the handpiece, filters, and cooling system.
- Never exceed the manufacturer’s recommended energy/current limits.
- Choose high-quality stacks (macro-channel designs are generally more forgiving than micro-channel in non-ideal conditions).
Degradation is inevitable — it’s the fundamental physics of semiconductor devices.
However, with proper operation and maintenance, a good-quality diode stack can deliver 15–20 million shots with acceptable performance (losses <20–25%). If you’re already seeing specific signs of degradation (uneven spot, sudden power drop, overheating errors, etc.) — describe the symptoms and I’ll help you diagnose what’s most likely happening!
What Happens to the Hair at the Microstructural Level During Laser Heating in Hair Removal. Hair is a complex keratin-based structure made up of several layers. In laser hair removal (808 nm diode laser), the energy is absorbed by melanin (the pigment) in the hair shaft and follicle, converted into heat, and causes thermal damage.
Let’s break it down step by step at the microstructural level.Brief Structure of the Hair
Hairs in catagen (transition) or telogen (resting) phases have much less melanin → weak or no effect.Visual Changes Under a Microscope
The laser does not simply “burn out” the hair.
It causes thermal denaturation of proteins and coagulation of melanin → the follicle is irreversibly damaged, and the hair stops growing permanently.
- Cuticle — the outermost layer, made of overlapping keratin scales (like roof tiles).
- Cortex — the main layer (80–90% of the hair), consists of α-keratin fibrils embedded in a matrix; this is where most of the melanin is located.
- Medulla — the central hollow core (present only in some thicker hairs).
- 50–60 °C (mild heating)
- Denaturation of proteins begins (α-keratin starts transforming into β-keratin).
- The cuticle slightly lifts, making the hair more brittle.
- Melanin heats up, but the follicle is not yet significantly damaged → temporary weakening of growth.
- 65–70 °C (the critical zone for effective hair removal)
- Complete denaturation of keratin in the cortex: the helical structure of the fibrils is destroyed, molecular bonds break apart.
- Melanin granules inside the cortex coagulate and break down.
- Stem cells in the bulge and matrix cells in the bulb of the follicle die from thermal shock → if the hair was in the anagen (growth) phase, it stops regrowing permanently.
- The cuticle is damaged → hair becomes dull and fragile.
- 80–100 °C and above
- Carbonization of melanin and keratin: proteins char, forming carbon residues.
- Vacuolization — steam bubbles form inside the cortex as water in the hair rapidly vaporizes.
- Total structural destruction: the hair essentially “explodes” from the inside, and the follicle undergoes necrosis.
- The characteristic smell of “burnt hair” comes from denatured keratin.
- Bulge — contains stem cells: at 70+ °C they are killed → no regeneration of new hair.
- Bulb — matrix cells (responsible for hair production): thermal coagulation stops cell division.
- Dermal papilla (vascular base): coagulation of tiny capillaries → the follicle is starved of nutrients.
Hairs in catagen (transition) or telogen (resting) phases have much less melanin → weak or no effect.Visual Changes Under a Microscope
- Before: smooth cuticle, dense and uniform cortex.
- After effective heating: cuticle lifts and peels off, cortex shows vacuoles (bubbles), melanin granules coagulate into dark clumps.
The laser does not simply “burn out” the hair.
It causes thermal denaturation of proteins and coagulation of melanin → the follicle is irreversibly damaged, and the hair stops growing permanently.
Why the Same Laser Machine Works Differently for Different PeopleA diode laser (or any cosmetic laser) is just a tool. The final result depends not only on the device itself, but mainly on the person operating it (the cosmetologist) and on the client.
Here are the main reasons why the exact same machine can give very different outcomes in different hands or on different people.1. The Cosmetologist — the Main Factor (70–80% of Success)
In the hands of a skilled professional — it’s a Ferrari.
In the hands of a beginner — it’s still a Ferrari, but it drives slowly and with a high risk of crashing.A great cosmetologist + proper client preparation + a well-maintained machine = consistently excellent and predictable results.
- Settings: One specialist sets 30 J/cm² with a 2-second pause between shots, another uses 40 J/cm² with almost no pause. The difference in follicle heating can be enormous.
- Technique of movement: Smooth, even passes with no gaps or overlaps vs random, chaotic movements — this directly affects uniformity and the actual amount of energy delivered per zone.
- Cooling and gel application: One applies a thick layer of cooling gel and keeps the handpiece tightly pressed to the skin; another applies a thin layer or leaves an air gap → difference in client comfort and treatment effectiveness can reach 20–30%.
- Experience: A beginner is afraid of burns and always uses low energy → weak results. An experienced professional knows the skin’s real limits and gets the maximum safe effect.
- Maintenance of the equipment: One regularly cleans the sapphire tip, filters, and handpiece; another does it rarely → over time the second one’s laser gradually loses real power.
- Skin phototype (Fitzpatrick I–VI): Light skin (I–III) responds much better to 808 nm; dark skin (IV–VI) requires extra caution, lower energy, and usually more sessions.
- Hair thickness and color: Dark, thick hairs are the perfect target (high melanin content). Light, gray, red, or very fine hairs absorb much less energy → significantly poorer results.
- Hormonal background: PCOS, thyroid issues, hormonal imbalances cause faster regrowth → more sessions are needed.
- Hair growth phase (anagen): Only 10–30% of hairs are in the active growth phase at any given time, and this percentage varies greatly between people and body areas.
- Preparation: One client shaves the area 24 hours before the session (ideal), another shaves a week earlier → big difference in effectiveness.
- Condition of the laser: Even the same machine gradually loses power over time (dust buildup, diode stack degradation, dirty filters) — without regular professional maintenance, results deteriorate.
- Room temperature and cooling system: Cold cooling water gives better results; if the system overheats or the room is too warm → weaker effect.
- Treatment regularity: One client follows the recommended schedule strictly, another takes long breaks → dramatically different final outcome.
In the hands of a skilled professional — it’s a Ferrari.
In the hands of a beginner — it’s still a Ferrari, but it drives slowly and with a high risk of crashing.A great cosmetologist + proper client preparation + a well-maintained machine = consistently excellent and predictable results.
Страница 1 из 7
- Вы здесь:
-
Главная

- Expert ROMSHI talks about lasers